
Why This Article Exists
If you run a bag brand in the United States and you’re sourcing from Chinese manufacturers, you already know the uncomfortable truth: the handle breaks first. Not the zipper, not the lining, not the outer shell — the handle. And the shoulder strap. And the little loop that holds your D-ring.
According to industry return data analyzed across thousands of SKUs, strap-to-body connection failures account for the highest percentage of bag product returns in the handbag, backpack, and luggage categories. That’s why this guide exists. I’m going to walk you through exactly what to ask your factory, what to inspect before shipment, and how to write your purchase contract so you’re protected when something goes wrong.
This is the same internal checklist my team uses before we greenlight a new supplier, and the same language we put into our purchase orders. Save it. Forward it to your sourcing agent. Use it on your next video factory audit.
The 3 Things That Must Happen at Every Load-Bearing Junction
Before we get into stitch counts and thread types, let’s get the philosophy right. Every load-bearing junction on a bag — meaning anywhere a handle, strap, or piece of hardware connects to the bag body — needs three things working together:
1. Wrapping — the strap material physically wraps around or anchors into a structural element
2. Stitching — properly tensioned, properly spaced, properly reinforced stitches
3. Reinforcement — an additional layer (bartack, backing patch, internal webbing, or anchor strap) that prevents tearing under load
If any one of these three is missing or weak, the junction will fail. It doesn’t matter how nice the leather is or how pretty the stitching looks on the outside. I’ve seen $200 handbags fail at the handle after three weeks of normal use because the factory skipped the reinforcement patch. I’ve also seen $30 backpacks survive five years of abuse because the supplier used a triple-row bartack with bonded nylon thread. The difference is in the assembly, not the material.
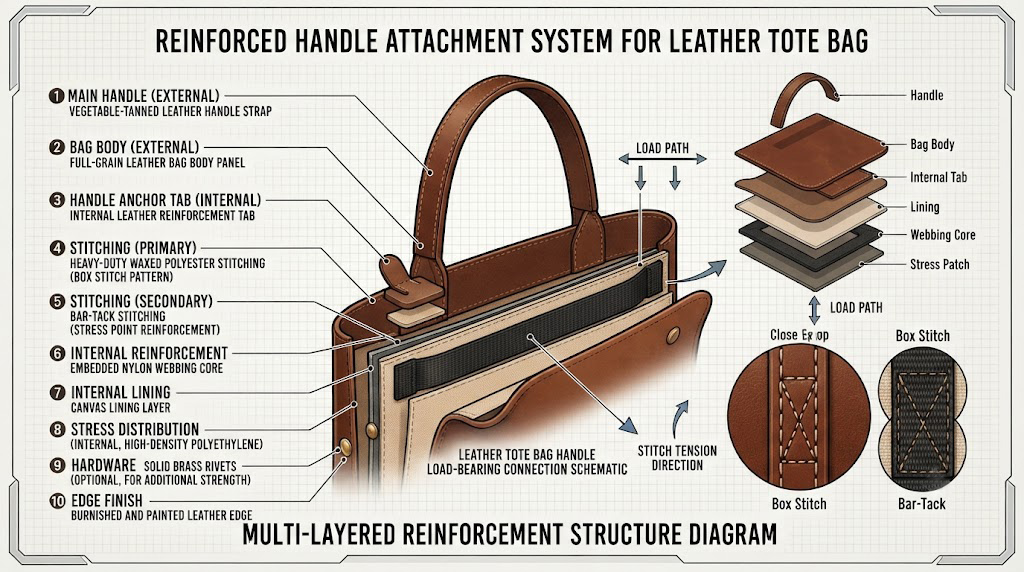
Every load-bearing junction needs three layers of redundancy: wrap, stitch, reinforce.
Stitch Patterns: Box-X vs. Single-Line
Let’s start with stitching, because it’s the easiest thing to inspect and the easiest thing to specify in writing.
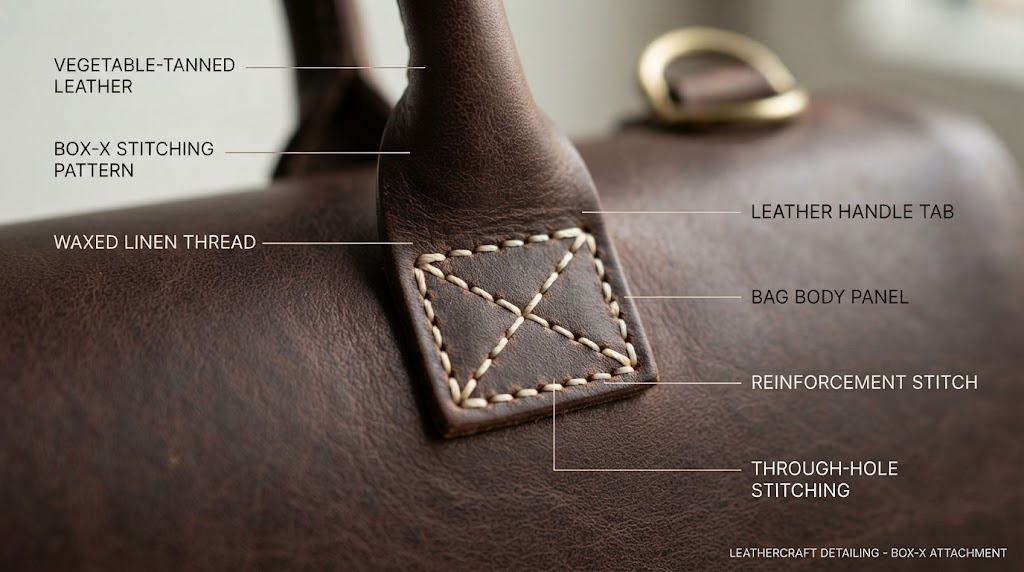
Box-X stitching (also called square stitching) at handle junctions distributes load more evenly than single-line stitching. Instead of one straight line of thread pulling in one direction, you have two intersecting lines forming a small box or X pattern. This significantly reduces tearing risk because the stress is spread across four segments of thread instead of one.
When I audit a factory, the first thing I look at under the magnifier is the pattern at the top handle base. If I see a single row of straight stitches — no box, no X, no bartack — I mark it as a critical defect and reject the lot. There’s no acceptable use case for single-line stitching at a primary handle junction on a handbag, backpack, or luggage piece.
For most handbag applications, here’s what we specify:
Box-X or square stitch at all top handle anchor points
Triple-row bartack at shoulder strap top connections
Double-row straight stitch along the body of the strap (where it’s not a junction)
Back-tack (3-4 reverse stitches) at the start and end of every seam
This combination gives you 2-3 times the seam strength of single-row stitching under stress testing, which is the difference between a bag that survives a warranty claim and a bag that doesn’t.
Thread Type and Stitch Density
Now let’s talk about thread. This is where a lot of American buyers get surprised, because the difference between good and bad thread isn’t visible until the bag has been used for 6-12 months.
Spools of bonded nylon and polyester thread in a bag factory sewing area
Bonded nylon or polyester thread (Tex 70-135) is the industry standard for bag straps. Not cotton. Not regular polyester. Bonded means the thread fibers are coated with a resin that:
Increases tensile strength
Reduces friction during high-speed sewing (which means more consistent stitch tension)
Improves abrasion resistance
Provides better UV stability for bags that will sit in the sun
If a factory quotes you a great price and you’re not sure why, ask what thread they’re using. If they say “regular polyester” or — worse — “cotton,” that’s your first red flag. Cotton thread has about 40% of the tensile strength of bonded nylon and will degrade quickly under load and UV exposure.
For stitch density, the industry sweet spot is:
6-8 stitches per inch (SPI) for strap assembly and general body seams
8-12 stitches per bartack bar at reinforcement points
Tension tight enough that you cannot easily separate the seam with your fingers, but not so tight that it puckers the material
Why not more SPI? Because over-perforating the material creates a different problem — you create so many holes that the material itself becomes the weak point. There’s a balance. 6-8 SPI gives you strong seams without turning the strap into a perforated strip.
Bartack Reinforcement: The Hidden Hero
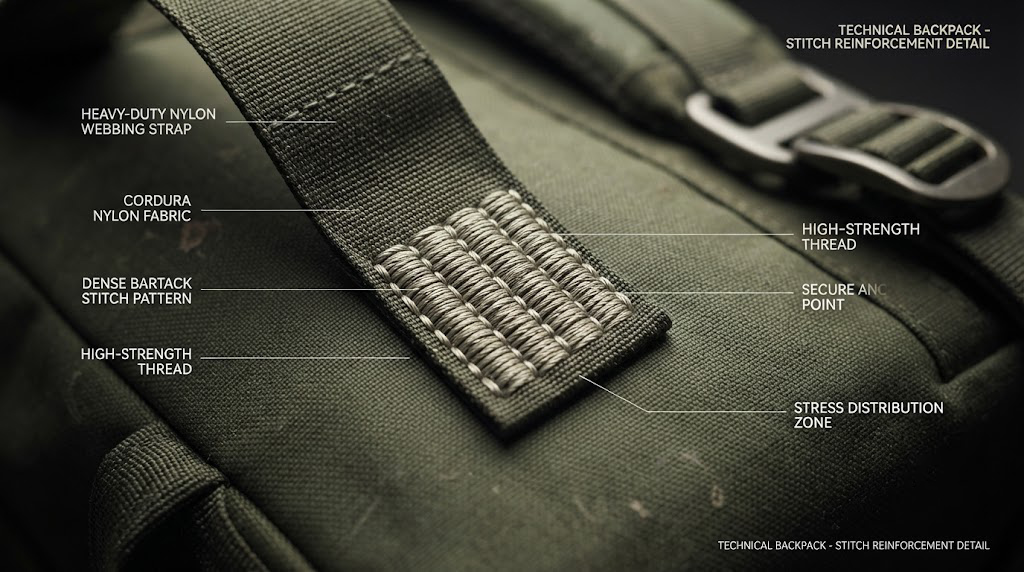
If you’ve ever looked at the bottom corner of a high-end backpack strap and seen a tight, dense rectangle of stitches, that’s a bartack. It’s typically done on a specialized bartacking machine that creates a very tight, very strong pattern in a small area.
Bartack reinforcement at load-bearing points should contain a minimum of 8-12 stitches per bar to meet standard handbag durability requirements. For heavier applications — luggage, travel bags, tactical backpacks — we go to 14-16 stitches per bar.
Here’s where factories cut corners: they use a regular straight stitch in a small rectangle and call it a “bartack.” It’s not. A real bartack has the dense, zigzag-interlocking pattern that only a bartack machine can produce. If you see loose, parallel stitches in a “reinforcement” area, that’s not reinforcement — that’s decoration.
What to look for in a real bartack:
Dense, tight stitch pattern (no gaps you can see through)
Slight raised texture from the thread pile
At least 1 inch (25mm) long, with multiple bars
Located at every primary load-bearing point
Critical junctions often include hidden interior webbing or anchor straps that attach directly to the bag’s internal frame, not just the outer shell. This is something you can’t see from the outside, which is why you need to ask the factory about it explicitly and ideally cut open a pre-production sample to verify. In a properly built handbag or backpack, the strap doesn’t just stitch to the outer fabric — it continues inside, anchors to a structural panel or frame element, and may include an additional webbing strap for redundancy.
The Wrapping Technique
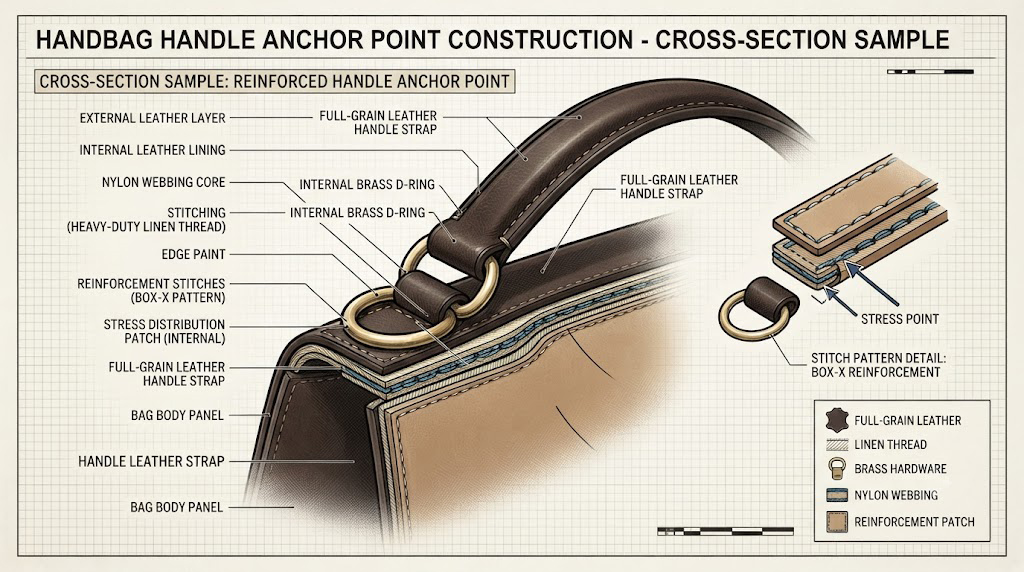
Now let’s talk about wrapping, which is the most under-appreciated part of handle assembly.
Wrapping technique should fully encircle the handle base at least 1.5–2 times before stitching to prevent slippage under repeated load. What this means in plain English: when the handle attaches to the bag, the strap material should wrap around a core element (a metal D-ring, a leather anchor tab, a webbing loop) at least one and a half full rotations before the stitching begins.
Why? Because every time someone picks up the bag, the handle tries to slide through its anchor point. If the wrap is loose or partial, the handle gradually migrates, the stitching sees shear stress instead of tensile stress, and the whole junction fails.
When I’m doing pre-shipment inspection, I physically try to slide the handle out of its anchor. If it moves at all, I reject it. It should feel like it’s locked in.
A few other wrapping rules we enforce:
No raw edges visible at the wrap point — edges should be folded, bound, or hidden
No glue as a primary attachment — glue can supplement stitching, never replace it
Hardware (D-rings, O-rings, swivel hooks) should be wrapped, not just threaded — the strap should pass through the hardware and back into itself, then stitched, so the hardware is mechanically captured even if the stitches fail
Hardware Attachment and Backing Patches
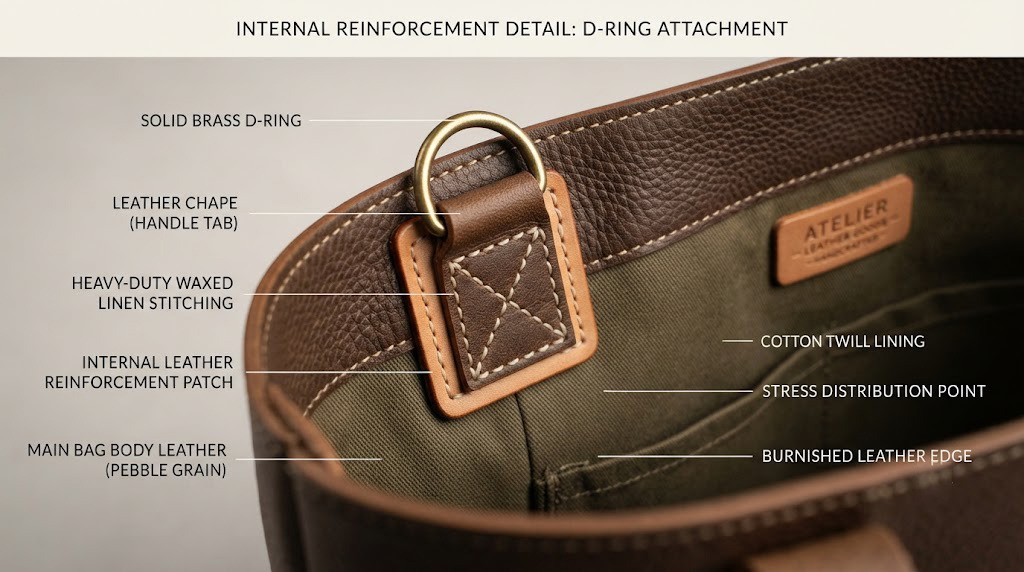
Speaking of hardware: hardware attachment points (D-rings, O-rings, swivel hooks) require reinforcement patches — typically leather or synthetic backing — underneath to prevent hardware from pulling through the fabric.
This is a very common defect in lower-tier factories. They attach a D-ring to the outside of the bag with a simple square of stitching, no backing. Under load, the metal ring cuts through the fabric like a cookie cutter. The bag fails. The customer is unhappy. You eat the return.
The fix is simple: a backing patch of the same material (or stronger) on the inside of the bag, with the hardware stitched through both layers. The patch should extend at least 10-15mm beyond the edge of the hardware in all directions to distribute the load.
I have personally rejected entire production runs for missing backing patches. It’s not a “nice to have.” It’s a structural requirement.
Load-Bearing Strength Testing
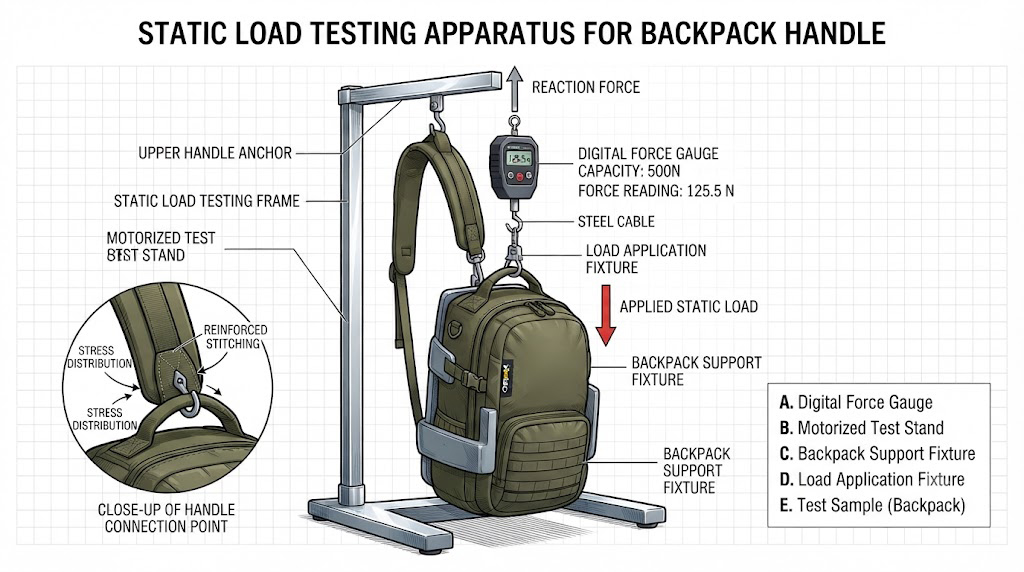
During pre-shipment inspection, you (or your third-party inspector) should physically test the handles and straps. Here’s how we do it, and what numbers we expect:
Handle pull strength should be tested to withstand at least 50 lbs (22.7 kg) static load for handbags and 100+ lbs (45+ kg) for travel and luggage bags.
The test is simple:
1. Hang a known weight from the handle (or use a force gauge with a pulling mechanism)
2. Apply the load gradually over 5-10 seconds
3. Hold for 30 seconds
4. Inspect for: stitch elongation, thread breakage, material tearing, hardware deformation, handle slippage
For shoulder straps, we do a similar test on the strap-to-body connection — that’s usually the weaker junction. For tote bags, we test both top handles simultaneously with a spreader bar to simulate a real carry.
If a sample fails at less than the specified load, the entire lot is suspect. We then pull 5-10 more samples from the lot. If the failure rate exceeds the AQL threshold, the lot is rejected.
We also do a cyclic load test on premium product lines: 1,000 cycles of loading to 50% of the static rating, then a final static test. This simulates years of normal use in a few hours. If the handle survives 1,000 cycles, it’ll survive your customer.
Most Common Defects in Handle Wrapping and Reinforcement
After thousands of inspections, here’s what we see most often:
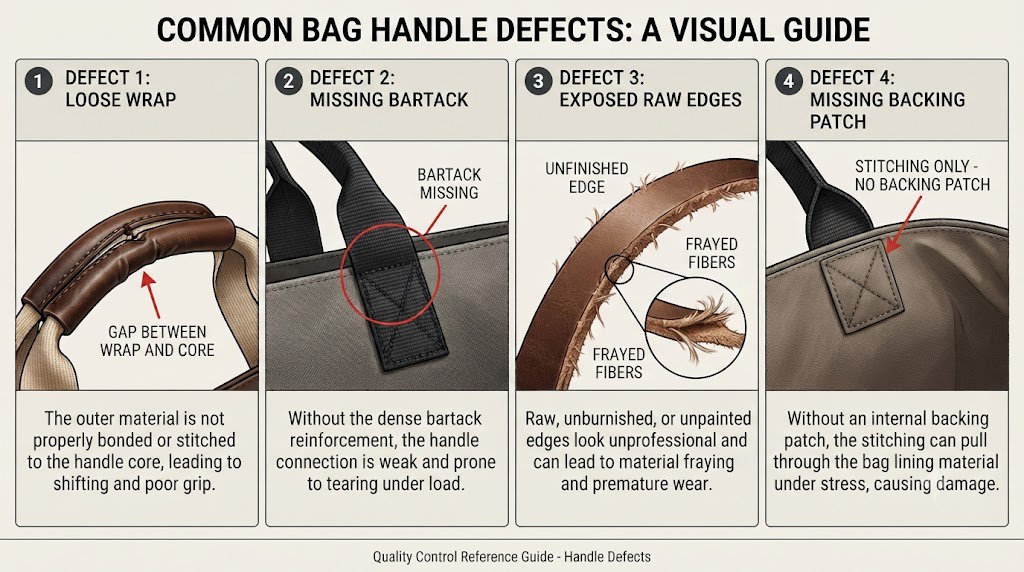
Common handle defects: loose wrap, missing bartack, exposed raw edge, missing backing patch
1. Missing or inadequate bartack — straight stitches used instead of dense bartack pattern
2. Loose wrapping — handle can be slid out of its anchor with finger pressure
3. Exposed raw edges at the wrap point (no edge finishing)
4. Missing backing patches under hardware
5. Single-row stitching at junctions that should have box-X or triple-row
6. Wrong thread type — cotton or non-bonded thread used on stress points
7. Skipped back-tacking — no reverse stitches at seam ends, so the seam unravels under stress
8. Hardware not mechanically captured — D-ring would fall out if stitching failed
9. Inconsistent stitch tension — some areas tight, some loose, leading to seam distortion
10. No internal anchor webbing — strap is only attached to the outer shell
These are all things your inspector can catch in 30 seconds per bag with a magnifier and a pull test. They are also all things the factory knew about and chose not to fix because the buyer didn’t specify.
Specifying Load-Bearing Requirements in Your Purchase Contract
This is the part most American buyers skip, then regret later. If you don’t put it in writing, it didn’t happen.
Purchase contract clause specifying handle and strap assembly requirements
Here’s the language we use in our purchase orders. Feel free to copy and adapt it:
Handle and Strap Assembly Requirements
All handle and strap assemblies must include: (a) full wrapping of the handle base a minimum of 1.5 times around the anchor element; (b) box-X or square stitching at all top handle junctions, with a minimum of 6-8 stitches per inch (SPI); (c) bartack reinforcement at all load-bearing points, with a minimum of 8-12 stitches per bar for standard handbags and 14-16 stitches per bar for travel/luggage; (d) bonded nylon or polyester thread (Tex 70-135 minimum) throughout; (e) reinforcement patches (leather or equivalent synthetic) of at least 10mm beyond hardware edges at all D-ring, O-ring, and swivel hook attachment points; (f) back-tacking of 3-4 stitches at the start and end of every seam.
Load-Bearing Performance Standard
All handle and strap assemblies must withstand a static load test of: (i) 50 lbs (22.7 kg) for handbags; (ii) 100 lbs (45 kg) for travel bags and luggage; (iii) 75 lbs (34 kg) for backpacks, with no visible deformation, stitch failure, or material tearing. The strap-to-body connection must be tested separately and meet the same standard.
Inspection and Acceptance
Pre-shipment inspection will include physical pull testing of handles and straps, visual inspection of all junction reinforcement, and verification of thread type. Lots failing AQL 2.5 inspection for any of the above criteria will be rejected at supplier cost.
That third section is critical. It tells the factory that you’re going to physically test the product, and that rejection has a real cost. Most factories will take the requirements much more seriously when they see that language in the PO.
How to Ask the Factory: The Exact Message to Send
Here’s a simple message you can send to your Chinese supplier today. I’ve used versions of this with hundreds of factories:
“Please confirm whether the handle and strap assembly includes wrapping, stitching, and reinforcement at all load-bearing junctions. For stress points, please specify the reinforcement method (bar-tack, box-X stitching, backing tape, or other) and send close-up photos or a test video before production begins. Please also confirm thread type (bonded nylon or polyester required) and stitch density (6-8 SPI). Failure to confirm these specifications in writing will result in rejection at pre-shipment inspection.”
A serious factory will respond with detailed answers and reference photos. A factory that gives you vague answers like “yes, strong handle, good quality” is telling you they’re not going to specify it — and they’re going to use their cheapest default construction. Walk away.
Your Complete Supplier Checklist
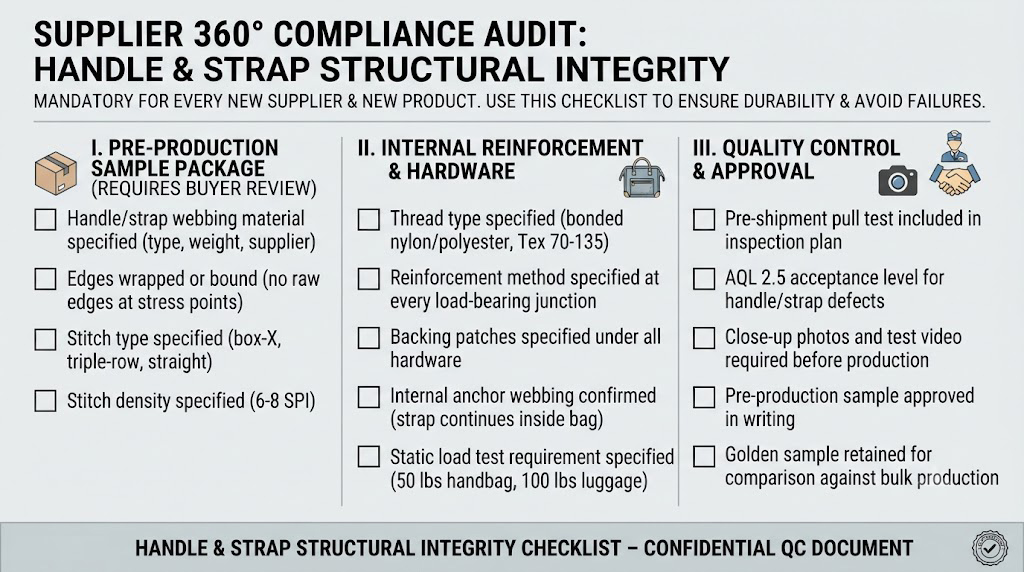
Use this on every new supplier and every new product:
Pre-production sample bag showing handle and strap construction for buyer review
Handle/strap webbing material specified (type, weight, supplier)
Edges wrapped or bound (no raw edges at stress points)
Stitch type specified (box-X, triple-row, straight)
Stitch density specified (6-8 SPI)
Thread type specified (bonded nylon/polyester, Tex 70-135)
Reinforcement method specified at every load-bearing junction
Backing patches specified under all hardware
Internal anchor webbing confirmed (strap continues inside bag)
Static load test requirement specified (50 lbs handbag, 100 lbs luggage)
Pre-shipment pull test included in inspection plan
AQL 2.5 acceptance level for handle/strap defects
Close-up photos and test video required before production
Pre-production sample approved in writing
Golden sample retained for comparison against bulk production
Final Thought: Why This Matters for Your Brand
Every handle that breaks is a customer who doesn’t come back. Every strap that fails is a negative review on Amazon, a return at Nordstrom, a complaint in a Reddit thread that lives forever. The cost of doing handle and strap assembly right is maybe 5-8% of the total bag cost. The cost of doing it wrong is the entire brand.
The good news: once you specify these requirements clearly, hold the factory to them with a written contract, and verify with a pre-shipment inspection, you’ll eliminate 90% of the handle and strap failures that drive returns. It’s not complicated. It just requires you to be specific.
That’s the difference between a bag brand that grows on referrals and a bag brand that grows on discounts.
Post time: Jul-16-2026